
Practice Point: Salute to the Sun
There are so many variations of surya namaskara, the sequence of postures known as the ‘Salute’ or ‘Salutation to the Sun’. It seems that every tradition of yoga has its own sequence comprising common postures with little tweaks to meet the requirements of the tradition or practitioner.
The Salute to the Sun is considered a complete yoga practice on its own. It contains every type of asana (posture) except a side bend and a twist and incorporates breathing and meditation techniques.
It can be practised slowly by taking time to hold and experience each posture. You can move with the breath to create a flowing, moving meditation or pick up the pace to warm and energise the body.
This sequence is the one that I learnt in my teacher training and in a chair yoga class. It might not exactly match what I teach in class—I’m always forgetting which leg I need to step forward or back, I like to take my arms out to the side to raise them instead of taking them up through the centre of the body, I add or change postures—but that’s the beauty of yoga! It’s forever evolving. Play with the postures and discover what sequence of postures feels right for you.
Before you begin ...
Be cautious if you:
- Have back or neck problems
- Have problems with blood pressure or vertigo
Move slowly between postures that raise and drop the head, or keep the head raised above or in line with the heart.
- Have abdominal problems or recent abdominal surgery
Choose postures that don't place pressure on the abdomen.
- Have eye problems such as glaucoma or detached retina, where it is not recommended that the head be inverted.
Keep the head slightly raised above or in line with the heart.
- Are pregnant
Choose postures that don't place pressure on the abdomen.
If you're using a chair, ensure that the chair is sturdy and won't move if you opt to sit and stand from the chair.
The sequence
The following table summarises the postures in the sequence. The full sun salutation comprises two rounds of this sequence: the first leading with the right leg, the second with the left.
| Position | Breathing | Chair posture | Floor posture |
|---|---|---|---|
| Start | Natural | Mountain | Mountain |
| 1 | Natural | Prayer pose | Prayer pose |
| 2 | In | Upward salute | Upward salute |
| 3 | Out | Forward fold | Forward fold or squat |
| 4 | In | Leg lock pose | Low lunge |
| 5 | Out | Mountain | Downward dog, table top or extended pose of the child |
| 6 | In | Cat | Cat or cobra (transitioning through caterpillar or plank) |
| 7 | Out | Cat | Cat, downward dog, table top or extended pose of the child |
| 8 | In | Leg lock pose | Low lunge |
| 9 | Out | Forward fold | Forward fold or squat |
| 10 | In | Upward salute | Upward salute |
| 11 | Natural | Prayer pose | Prayer pose |
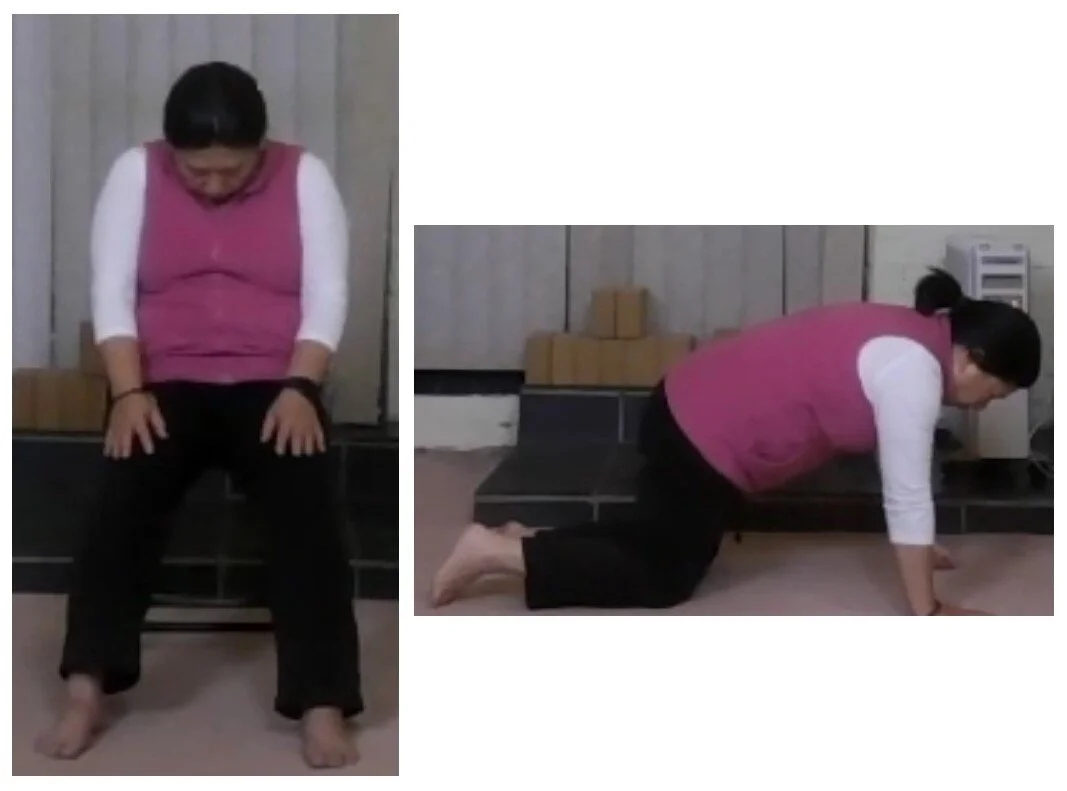
Start position: Mountain
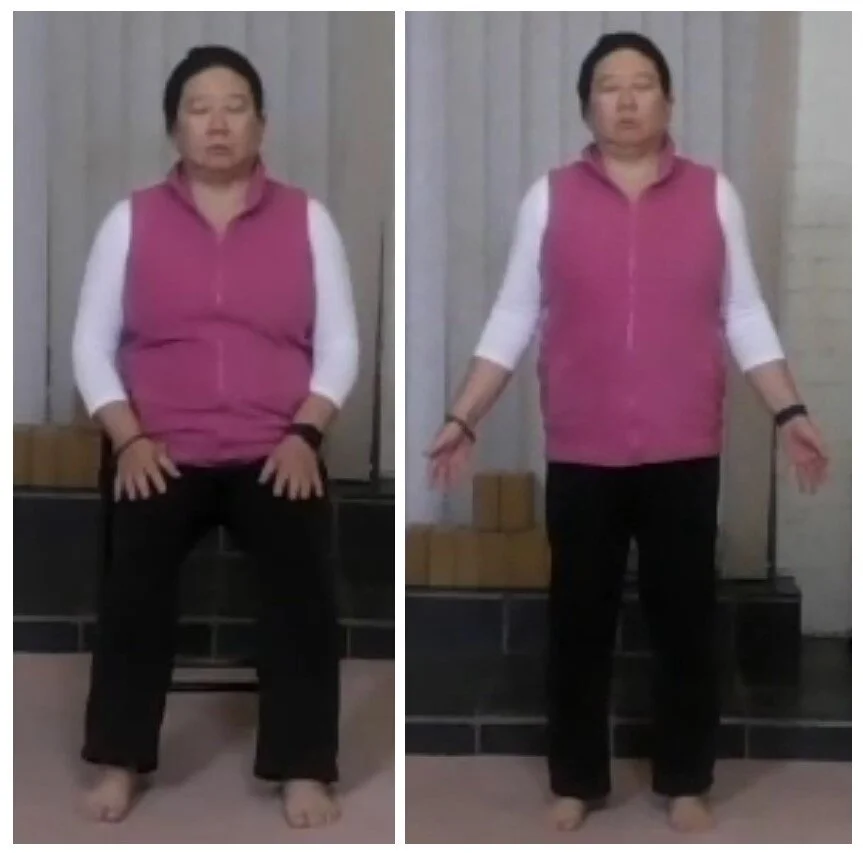
Left: Seated mountain; Right: Mountain
If sitting in a chair, sit towards the front of the seat with the hands resting on the thighs and feet flat on the floor or support.
If standing, stand at the front of the mat or in front of the chair with the hands by the side.
Adjust the position of the feet so that you feel balanced, tall and steady (like a mountain). About hip width will provide stability for the body; slightly wider than hip width might be more comfortable for squats and forward bends.
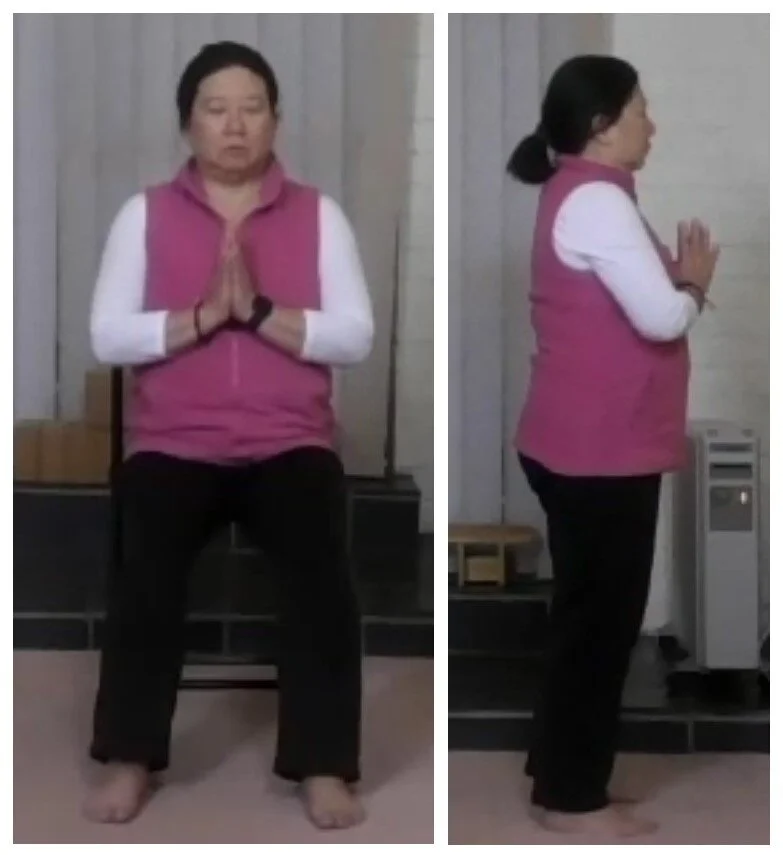
Position 1: Prayer pose

Prayer pose
Bring the palms of the hands together and place them in front of the breast bone.
Position 2: Inhale - Upward salute
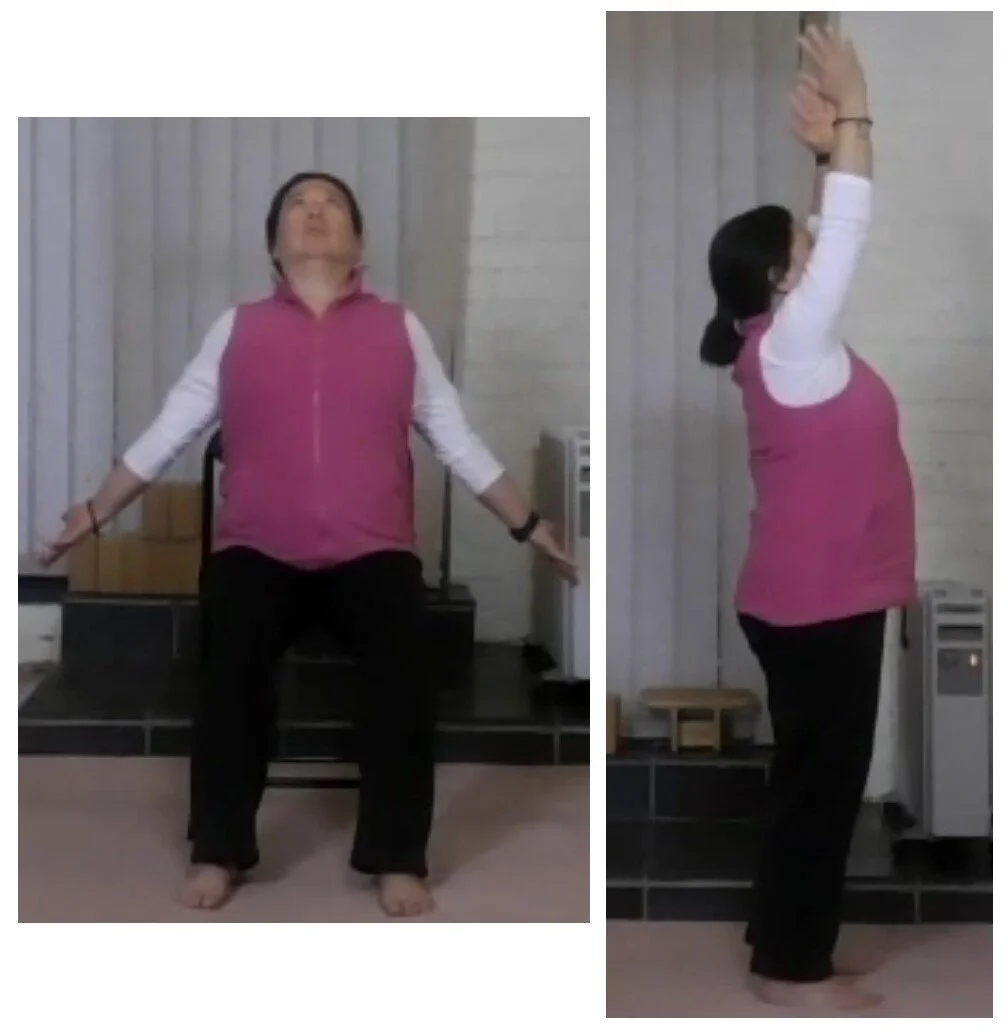
Upward salute variations
Lengthen the spine. Either:
Draw the hands up through the centre of the body as high as comfortable and then separate the hands, or
Bring the hands out to the side and rotate the shoulders out so the palms turn out and there is a sense of opening across the chest.
Keeping the length in the spine, lift the breastbone to the sky. Maintain a long neck by bringing the chin towards the chest; don’t let the head fall back.
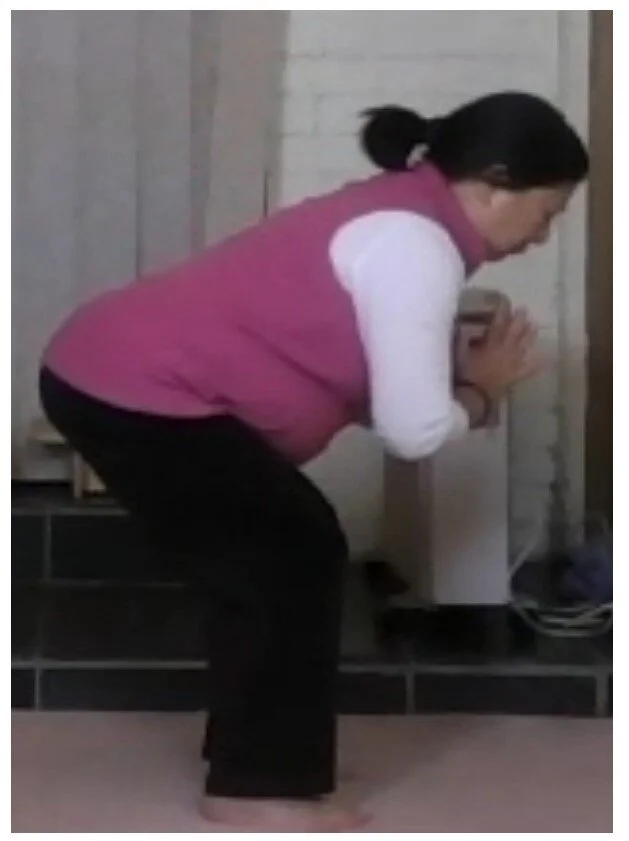
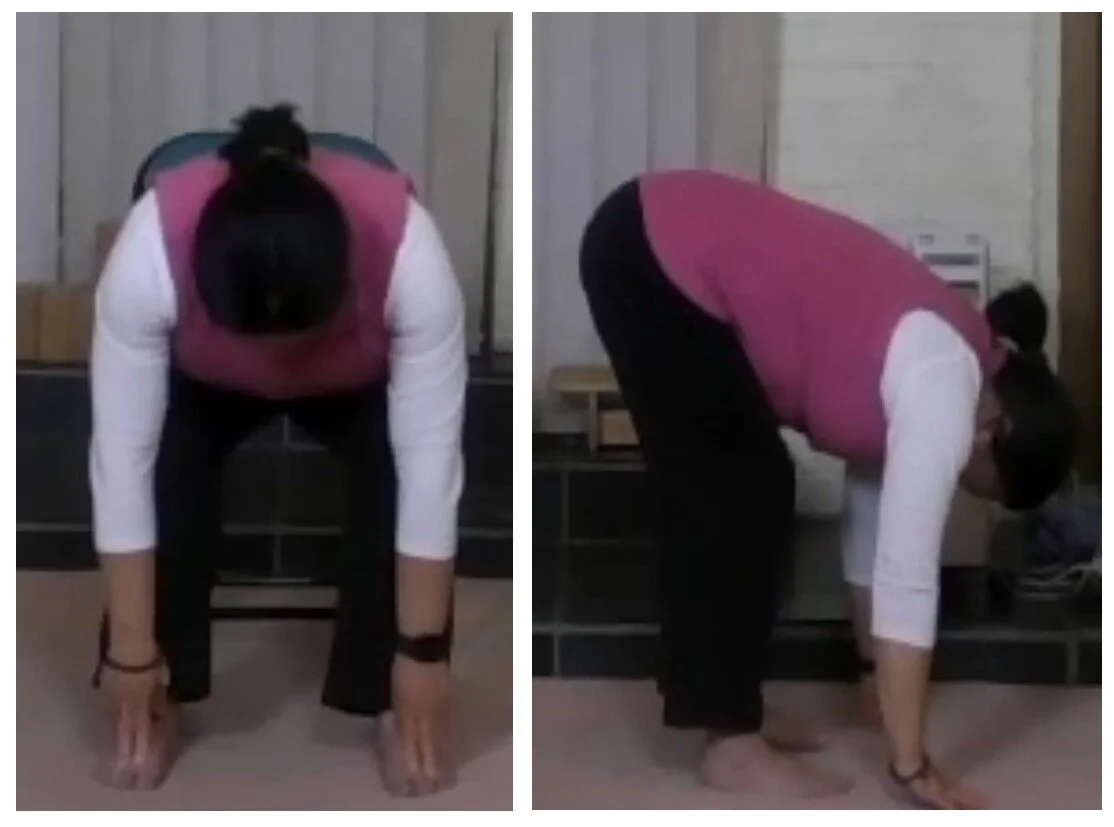
Position 3: Exhale - Forward fold or Squat
Perform the forward fold from a standing position or while sitting in the chair.
Perform the squat from a standing position.
Forward fold

Forward fold
Sit in the chair, if you wish to perform this posture from the chair.
Start with the legs about hip-width apart but adjust the distance as needed to feel comfortable in the forward fold.
Bring the hands to the hips.
Fold forward from the hips keeping the back and head in line.
If standing, bend the knees to bring the abdomen in contact with the thighs.
If seated, slide the hands down the legs.
Tip: Place the fingers in the crease between the top of the legs and pelvis to provide feedback on where the movement is initiated.
Something stronger? Keep arms extended above the head.
Lower the head and bring the hands forwards the floor.
Tip: If you prefer to keep your head raised, bring your hands to blocks or place them on your shins. If you’re sitting in a chair, you can also lean forward and rest your forearms on your thighs.
Squat
Bring the hands to the hips and ‘sit’ back keeping the back and head in line.
To minimise strain on the knees, keep the knees over the ankles so that the knees are supported by the lower leg.
Tip: Place the fingers in the crease between the top of the legs and pelvis to provide feedback on where the movement is initiated.
Something stronger? Keep arms extended above the head.
Squat
Position 4: Inhale - Leg lock pose or Low lunge
Perform the leg lock pose while sitting in the chair.
Perform the low lunge from a standing position.
Leg lock pose

Leg lock pose with the right leg
If you’re transitioning from a standing forward fold, lower your buttocks onto the seat.
Place your hands on your thighs and bring the torso upright.
Sitting tall, raise the right knee towards the body.
Second time through: Raise the left knee towards the body
Optionally, hug the knee into the body and maybe draw the abdomen in and bring the nose towards the knee.
Low lunge

Low lunge
Extend the right leg back and place the knee on the floor.
To minimise strain on the front knee, ensure the knee is above or slightly behind the ankle so the knee is supported by the lower leg.
Second time through: Step back with the left foot.
Lengthen through the spine.
Option: See whether resting hands on blocks or on your front knee helps you to lengthen the spine.
Consider lifting the breastbone slightly to create openness through the chest. Keep the neck long; don’t let the head fall back.
See Practice Point: Low Lunge & Supported Bridge for more information on the low lunge.
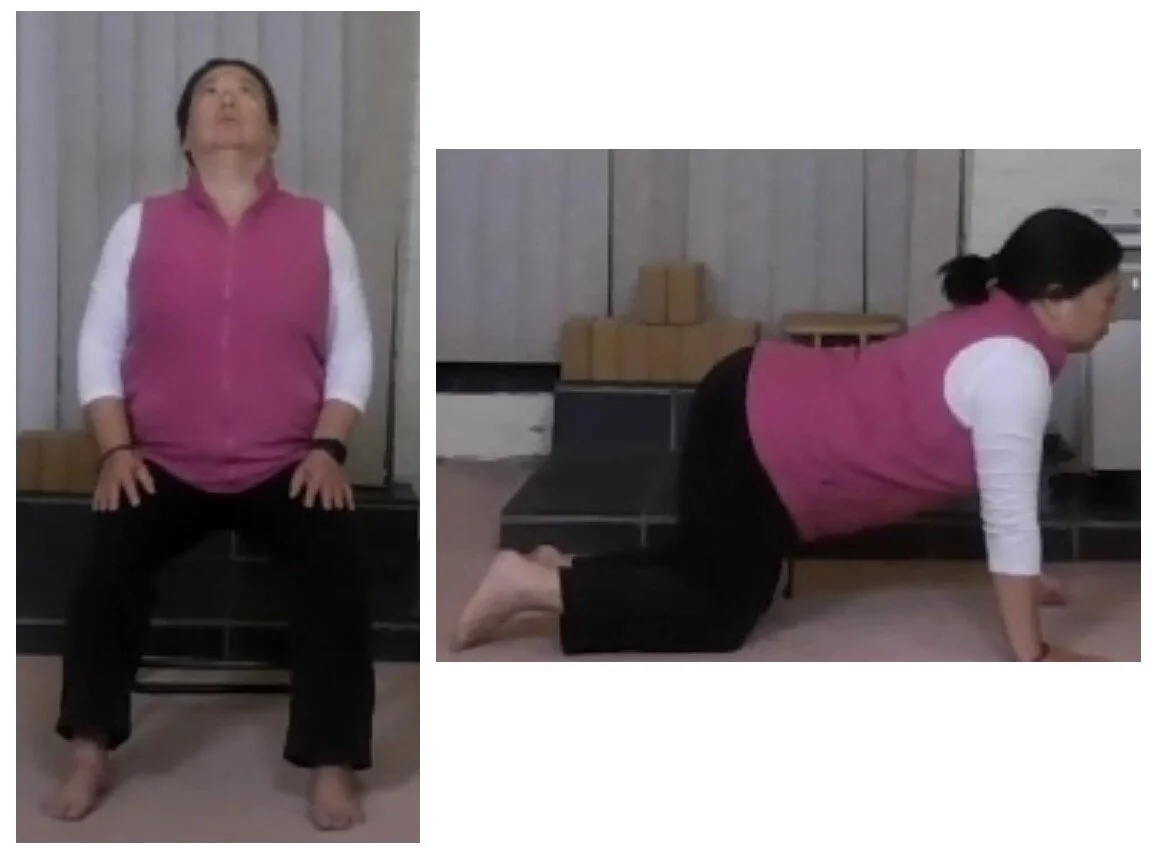
Position 5: Exhale - Mountain or Downward dog variations
Move into the mountain pose if you’re sitting in a chair.
If you’re not using a chair, move into downward dog or a similar posture.
Seated mountain
From the leg lock pose:

Seated mountain
Slowly straighten the spine, release the knee and lower the foot to the floor.
Place the hands on the thighs.
Downward dog variations
From the low lunge:

Top: Table top
Middle: Extended pose of the child
Bottom: Downward dog
Bring the palms to the floor and step the left foot back in line with the right foot.
Ensure the feet are about hip-width apart.
Second time through: Step the right foot back in line with the left.
Do one of the following:
Remain on the hands and knees in table top.
Keep the hands where they are and push the buttocks back towards the heels, bringing the head towards the floor - extended pose of the child.
Tip: Play with this position. Try taking the knees wider or resting the forehead on your hands.
Turn the toes under, raise the buttocks and lower the head between the arms in downward dog.
Lengthen through the spine and keep the knees soft.
Position 6: Inhale - Cat or Cobra transition
Perform cat while seated in the chair.
If you're working from the floor, move into caterpillar or plank, and then into cobra (or a similar pose like sphinx).
Cat inhalation
Cat on the inhalation
If you’re on the floor, come onto the hands and knees.
Tilt the tailbone towards the back of the chair (if you’re seated) or towards the sky (if you’re on your hands and knees).
Lengthen through the spine creating an arch in the back and opening the chest.
In a chair? Increase the stretch by sliding the hands towards the body, keeping the elbows close to the body and squeezing into the shoulder blades.
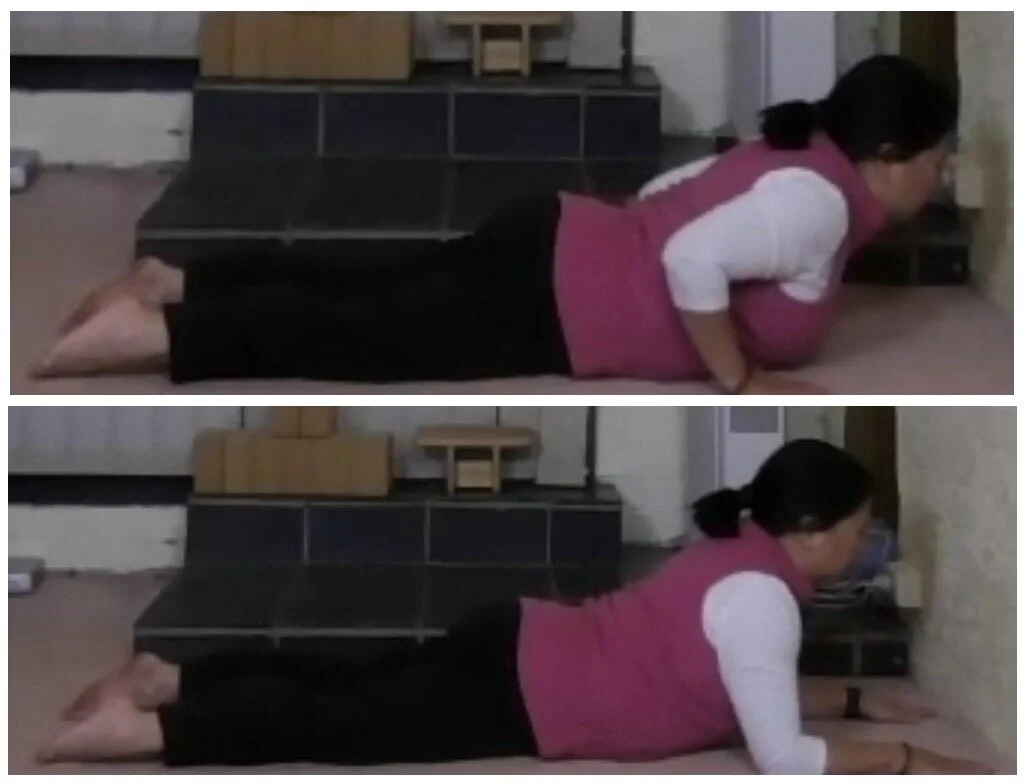
Cobra transition
Transitioning through caterpillar

Transition postures.
Top: Caterpillar; Bottom: Plank
Move into caterpillar:
Come onto the hands and knees, and turn the toes under.
Bring your body weight forward and lower the chest between the hands and the chin to the floor.
Keep the elbows against the body and roll the shoulders away from the ears.
Transition into cobra:
Slide the body forward, lower the pelvis, and raise the head.
Adjust the position of the hands to ensure that the spine feels long and there is no discomfort in the back.
Transitioning through plank
Top: Cobra
Bottom: Sphinx, a variation of cobra
Move the body weight forward and drop the buttocks so that the shoulders are over the wrists.
The knees can be on the floor or lifted off the floor.
Feel that the body is in one straight line from the knees or feet, to the head.
Transition into cobra:
Lower the body to the floor.
Brace and lengthen through the back, then peel the upper body off the floor.
Adjust the position of the hands to ensure that the spine feels long and there is no discomfort in the back.
See Practice Point: Cobra (and Sphinx) for more information on the cobra pose and variations.
Position 7: Exhale - Cat or Downward dog transition
Perform cat from the floor or the chair. If you're on the floor, transition from cat into downward dog or a similar pose.
Cat exhalation
Cat on the exhalation
Draw the tailbone under, round through the back and drop the head.
In a chair? Increase the stretch by sliding the hands forward along the thighs towards the knees.
Downward dog transition
Transitioning from cat exhalation
Do one of the following:
Straighten the spine to come into table top.
Push the buttocks back towards the heels, bringing the head towards the floor - extended pose of the child.
Tip: Play with this position. Try taking the knees wider or resting the forehead on your hands.
Turn the toes under, raise the buttocks and lower the head between the arms in downward dog.
Lengthen through the spine and keep the knees soft.
Transitioning from cobra
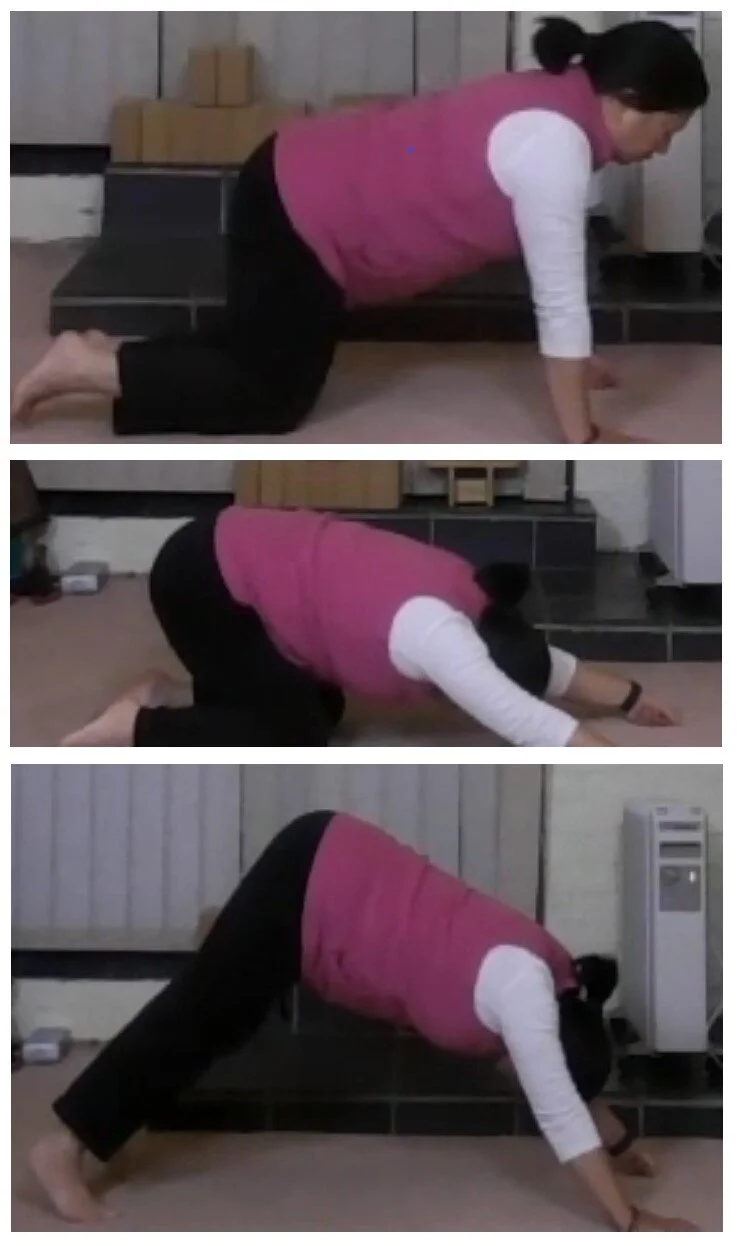
Table top, extended pose of the child, and downward dog
Lower your body to the floor and position your hands under the shoulders.
Do one of the following:
Come onto the hands and knees in table top.
Push the buttocks back towards the heels, bringing the head towards the floor - extended pose of the child.
Tip: Play with this position. Try taking the knees wider or resting the forehead on your hands.
Turn the toes under, raise the buttocks and lower the head between the arms in downward dog.
Lengthen through the spine and keep the knees soft.
Position 8: Inhale - Leg lock pose or Low lunge
Perform the leg lock pose while sitting in the chair.
Perform the low lunge from a standing position.
Leg lock pose

Leg lock pose with the left leg
Sitting tall, raise the left knee towards the body.
Second time through: Raise the right knee towards the body
Optionally, hug the knee into the body and maybe draw the abdomen in and bring the nose towards the knee.
Low lunge

Low lunge
Step the left foot forward in line with the hands and lower the right knee to the floor.
To minimise strain on the front knee, ensure the knee is above or slightly behind the ankle so the knee is supported by the lower leg.
Second time through: Step the right foot forward.
Tip: To bring the front foot in line with the hands, try:
Coming onto the hands and knees.
Taking hands off the floor to come into a high kneeling position.
Stepping forward with the left or right foot.
Placing the hands on either side of the front foot.
Lengthen through the spine.
Option: See whether resting hands on blocks or on your front knee helps you to lengthen the spine.
Consider lifting the breastbone slightly to create openness through the chest. Keep the neck long; don’t let the head fall back.
See Practice Point: Low Lunge & Supported Bridge for more information on the low lunge.
Position 9: Exhale - Forward fold or Squat
Perform the forward fold from the floor or the chair.
Perform the squat from the floor.
Forward fold
Transitioning from leg lock pose
Forward fold
Straighten the spine, release the knee and lower the foot to the floor.
Bring the hands to the hips, and fold forward from the hips keeping the back and head in line.
Slide the hands down the legs.
Tip: Place the fingers in the crease between the top of the legs and pelvis to provide feedback on where the movement is initiated.
Something stronger? Keep arms extended above the head.
Lower the head and bring the hands forwards the floor.
Optionally, bring the weight forward and lift the buttocks off the chair to come into a standing forward fold.
Tip: If you prefer to keep your head raised, bring your hands to blocks or place them on your shins. If you’re sitting in a chair, you can also lean forward and rest your forearms on your thighs.
Transitioning from low lunge
Step the right foot up beside the left.
Second time through: Step the left foot forward.
Keep the abdomen close to the thighs, raise the buttocks and lower the head towards the floor.
Tip: If you prefer to keep your head raised, bring your hands to blocks or place them on your shins.
Squat

Squat
Step the right foot up beside the left.
Adjust the distance between your feet to ensure that you feel steady.
Second time through: Bring the left foot up beside the right.
Bring the body weight towards the heels of the feet and slowly bring the body upright, keeping the back and head in line. Place the hands on the hips.
To minimise strain on the knees, keep the knees over the ankles so that the knees are supported by the lower leg.
Something stronger? Extend the arms above the head.
Position 10: Inhale - Upward salute
Transitioning from a seated forward fold

Upward salute
Place your hands on your thighs and bring the torso upright.
Lengthen the spine. Either:
Turn the palms towards the body and raise the arms up in front and overhead as high as comfortable, or
Bring the hands out to the side and rotate the shoulders out so the palms turn out and there is a sense of opening across the chest.
Keeping the length in the spine, lift the breastbone to the sky. Maintain a long neck by bringing the chin towards the chest; don’t let the head fall back.
Transitioning from a standing forward fold or squat
Bring the hands to the hips.
Something stronger? Extend the arms above the head.
From the forward fold, bend the knees and bring the body weight towards the heels of the feet.
Slowly bring the body upright, keeping the back and head in line, and straighten the legs.
Lengthen the spine. Either:
Turn the palms towards the body and raise the arms up in front and overhead as high as comfortable, or
Bring the hands out to the side and rotate the shoulders out so the palms turn out and there is a sense of opening across the chest.
Keeping the length in the spine, lift the breastbone to the sky. Maintain a long neck by bringing the chin towards the chest; don’t let the head fall back.
Position 11: Exhale - Prayer pose
Prayer pose
Straighten the body.
Bring the palms of the hands together and slowly bring them in front of the breastbone.
If this is the first round (that is, the first half of the sequence), take a couple of resting breaths and move into a second round of postures leading with the left foot.
Back to sequence postures Back to list of sections
After the practice
After practising rounds of surya namaskara, come into a rest posture either seated or lying down. See Shavasana - The Pose, Modifications & Alternatives for some suggestions.
This period of rest balances the dynamism of the sequence and lets the benefits of the sequence be integrated into the body. It provides time for the body to return to equilibrium and the mind to settle.
Benefits
Improves mobility of joints
Stretches, massages, and tones the muscles of the body
Stimulates and balances the systems of the body, particularly the cardiovascular and respiratory systems
Improves mental clarity and focus